It is time to show you how easy it is to develop integration and load tests using Karate. This is a very technical post, so I recommend you to read this as an introduction.
Before we begin, I would like to mention that all the examples used here are based on a very basic API I developed as example. You will find the link to my Github repository at the end of the post.
That said, let’s start!
Include the dependencies
There are only two dependencies needed to run the tests, but since we want to use Cucumber reports instead of the standard ones provided by Karate, we will need to add a third dependency.
<dependency>
    <groupId>com.intuit.karate</groupId>
    <artifactId>karate-apache</artifactId>
    <version>${karate.version}</version>
    <scope>test</scope>
</dependency>
<dependency>
    <groupId>com.intuit.karate</groupId>
    <artifactId>karate-junit4</artifactId>
    <version>${karate.version}</version>
    <scope>test</scope>
</dependency>
<dependency>
    <groupId>net.masterthought</groupId>
   <artifactId>cucumber-reporting</artifactId>
    <version>${cucumber-reporting.version}</version>
</dependency>
Configure Karate
We can provide Karate a javascript file which will be used as a global configuration. Despite it is not mandatory, I highly recommend to use it because it will improve the mantainability and readability of our Karate features.
Furthermore, it is as easy as create the file in the root of the classpath and name it karate-config.js. Karate will automatically find it and read the configuration. It is useful for example to configure things like environment or any parameters we will use in the features.
function fn() {

    var environment = karate.properties['env'];
    if(!environment) {
        environment = 'localhost'
    }

    var port = karate.properties['port'];
    if(!port) {
        port = '8082'
    }

    var host = 'localhost';
    if('dev' === environment) {
        // configure your own IP here
        host = '192.168.1.203'
    }

    karate.log('using ' + environment + ' environment')

    return {
        apiBasePath: 'http://' + host + ':' + port + '/tasklist-management/api'
    };
}
Write the tests
Now come the best part, programming the Karate features. A good idea is to separate features in different groups instead of having only one feature which test the whole API. This way we will have a better overview later in the reports, improving the understanding of the results.
Feature: Test operations with projects

  Background:

    * url apiBasePath

  Scenario: get projects should return 200 and list with projects

    Given path 'projects'
    When method GET
    Then status 200
    Then match each $ contains { projectId: '#number' }
    And assert response.length == 2
    * def projectId = response[0].projectId
    * print projectId

    Given path 'projects/' + projectId
    When method GET
Then status 200Feature: Test operations with tasks
Background:
* url apiBasePath
Scenario: get tasks should return 200 and list with tasks
Given path 'projects/1/tasks'
When method GET
Then status 200
Then match each $ contains { taskId: '#number' }
* def taskId = $[1].taskId
* print taskId
Given path 'projects/1/tasks/' + taskId
When method GET
Then status 200
Some concepts to clarify:
- Feature: Contains a short description of what we want to do
- Background: This section contains configuration that will be applied to all the scenarios in the feature. In the cases above, I configured the url where the API is supose to run, so I will not need to configure it anymore on the scenarios (only the path). In addition, we can access here to the variables we exported in the karate-config.
- Scenario: Each feature can contain one or more scenarios. This section contains the test itself programmed with the BDD syntax. We can make assertions or save some values in variables to be used later on.
Configure the test runner
Once we have designed the Karate features, the last thing to do is to develop the JUnit test runner.
@CucumberOptions(features = "classpath:features")
public class KarateRunnerTest {

    @Test
    public void testRunner() {
        String karateOutputPath = "target/cucumber-html-reports";
        KarateStats karateStats = CucumberRunner.parallel(getClass(), 1, karateOutputPath);
        generateReport(karateOutputPath);
        Assert.assertEquals("Some scenarios did not pass the tests", 0, karateStats.getFailCount());
    }

    private static void generateReport(String karateOutputPath) {
        Collection<File> jsonFiles = FileUtils.listFiles(new File(karateOutputPath), new String[]{"json"}, true);
        final List<String> jsonPaths = new ArrayList(jsonFiles.size());
        jsonFiles.forEach(jsonFile -> jsonPaths.add(jsonFile.getAbsolutePath()));
        Configuration configuration = new Configuration(new File("target"), "Tasklist Management API");
        ReportBuilder reportBuilder = new ReportBuilder(jsonPaths, configuration);
        reportBuilder.generateReports();
    }
}
As you can see, the first line contains the path where I have located my tests, so Karate will find and execute them. Afterwards, we will be able to locate the Cucumber reports under the path target/cucumber-html-reports.
Execute the tests
It is time to check if what we have done so far it is working, so let’s run the tests:
mvn clean test
If everything is fine, we will see in the console output a successful message. Then we should find the Cucumber reports under the configured path:
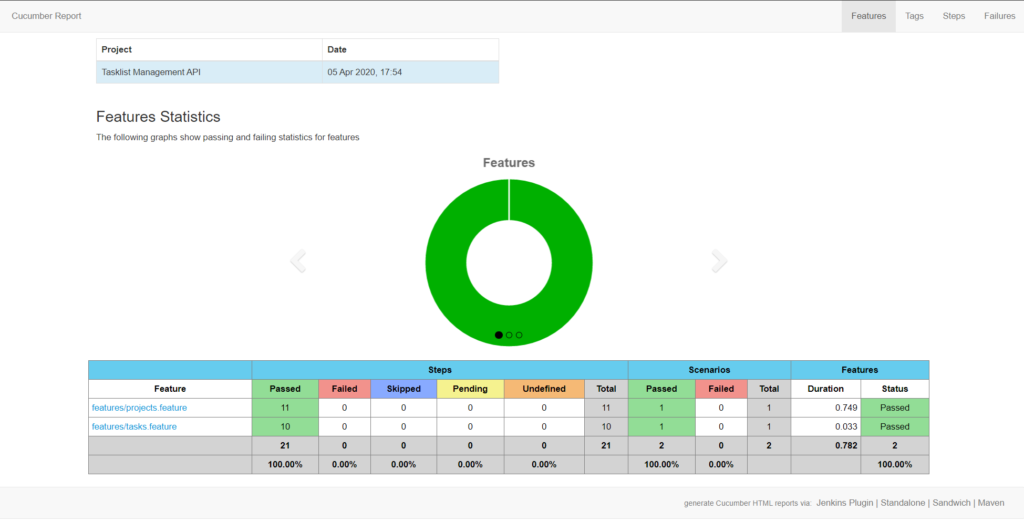
This is an html page which we can interact wich. If we want to see a better detailed information about our test results, we can click over the features, for example features/projects.feature
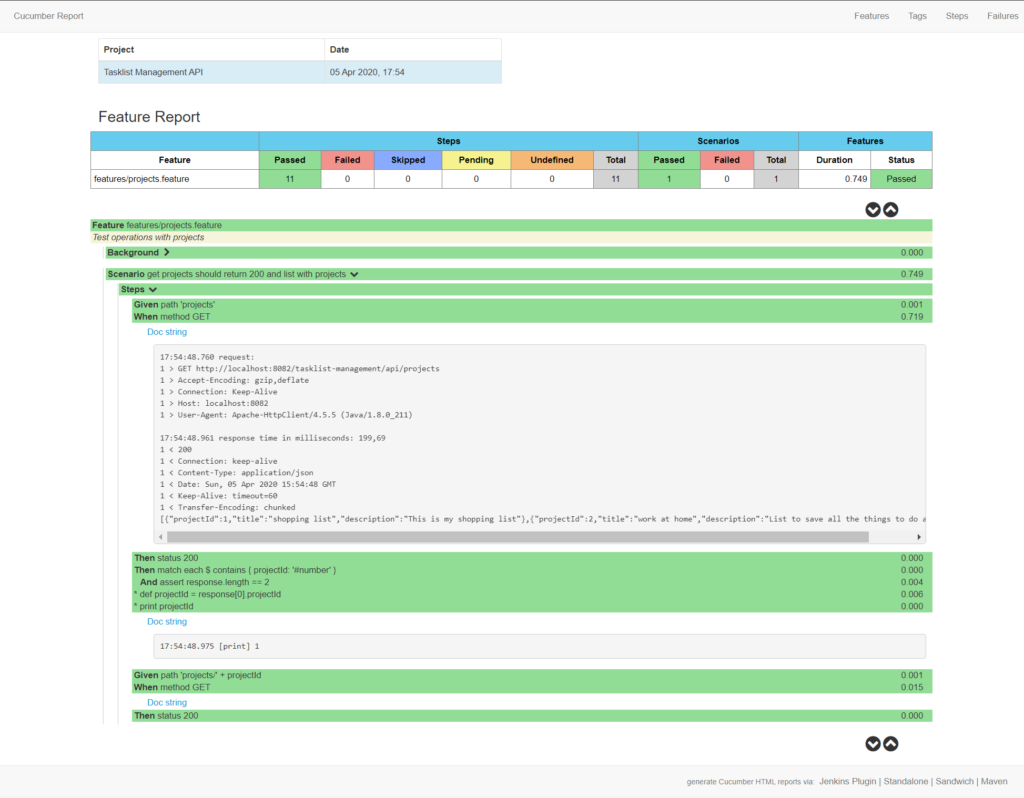
Every step we declared in the feature has been successfuly tested, we can even see the response obtained from the API.
Gatling integration
This is one of the strengths of Karate and one of the reasons why I like to use it in my APIs. Karate provides a Gatling integration that allow us to perform load tests using the same features or scenarios that we developed for the integration tests, so we have at this point half of the work done.
Import the following dependency in your project:
<dependency>
    <groupId>com.intuit.karate</groupId>
    <artifactId>karate-gatling</artifactId>
    <version>${karate.version}</version>
    <scope>test</scope>
</dependency>
Just like we did with the integration tests, we need now to develop the Gatling runner. Gatling tests are written in Scala, so we need to setup a new plugin to compile them. Furthermore, we will add the Gatling plugin to tell maven where our simulation is located:
<plugin>
    <groupId>io.gatling</groupId>
    <artifactId>gatling-maven-plugin</artifactId>
    <version>3.0.5</version>
    <configuration>
	<simulationsFolder>src/test/java/${project-base-package}/simulations</simulationsFolder>
    </configuration>
</plugin>
Please do not worry if you do not feel comfortable using Scala. Since our whole test logic takes place in the Karate features, the only thing we need to configure in Scala is the load behavior (number of users, duration…). This is the example I will use today:
class LoadTests extends Simulation {

  before {
    println("Tasklist Management Load Tests are about to start!!")
  }

  val rampUsersCount: Int = Properties.propOrElse("rampUsers", "20").toInt
  val rampDuration: Int = Properties.propOrElse("rampDuration", "5").toInt

  val tasklistManagementTest: ScenarioBuilder = scenario("Tasklist Management Simulation")
    .exec(
      karateFeature("classpath:features/projects.feature")
    )

  setUp(
    tasklistManagementTest.inject(rampUsers(rampUsersCount) during rampDuration)
  )

  after {
    println("Tasklist Management Load Tests finished!!")
  }
}
In the line 12 I am saying that my scenario is the Karate feaure located under the path features/projects.feature. Afterwards in the line 16, I am telling Gatling to inject 20 users during 5 seconds.
To run this simulation, we will use the gatling plugin we configured before:
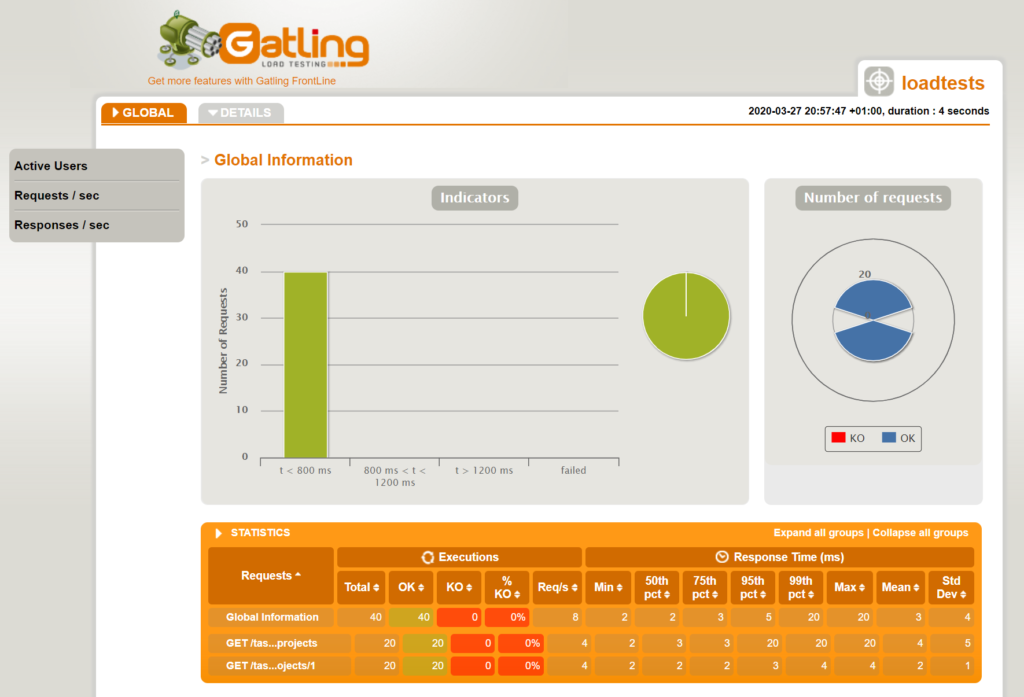
mvn clean gatling:test
As a result, the load test will start and we will see the results in the generated reports:
Automate everything
Well, we have reached the best part of the process. What’s the point of having high quality tests, if we can not run them automatically? In this section I will show you an example of how to develop pipelines to run the tests via Jenkins.
You can install them either manually or using a SeedJob. In my case I have used the second option (you can find an example in my repository).
In order to make the tests a little bit more “real”, I deployed the API to a separate machine (a Raspberry Pi), so I configured the IP address as “dev” environment in the karate-config.js.
Integration tests
The first one is easy, and it will aim to simply run the integration tests using the Karate Features and publish the Cucumber reports. You can find it an example of it in this file.
Before running the pipeline, you will need to install the Cucumber Reports plugin in your Jenkins. That way, you will be able to visualize the reports generated by your tests directly from Jenkins.

Load tests
I will focus a little more closely on the second one, which will run load tests through Jenkins.
We will be able to configure the number of users and duration of the tests through input parameters, as well as the environment in which our API is running. That said, you can find the pipeline in this file.
Once we get the pipeline installed in Jenkins, it will look like as follows:

Before we trigger the Job, you will need to install the Gatling plugin in your Jenkins. The aim of the plugin is to collect the results of the Gatling tests and display the reports directly on Jenkins. This will be done automatically in the post phase gatlingArchive().
Now all you have to do is run it, so to do this simply select the number of users and the duration of the test, then click on the build button. You will see the results in the Jenkins console output.
Tasklist Management Load Tests are about to start!!
Simulation com.binary.mindset.simulations.LoadTests started...
================================================================================
2020-04-09 23:45:17                                           5s elapsed
---- Requests ------------------------------------------------------------------
> Global                                                   (OK=40     KO=0     )
> GET /tasklist-management/api/projects                    (OK=20     KO=0     )
> GET /tasklist-management/api/projects/1                  (OK=20     KO=0     )

---- Tasklist Management Simulation --------------------------------------------
[##########################################################################]100%
          waiting: 0      / active: 0      / done: 20
================================================================================

Simulation com.binary.mindset.simulations.LoadTests completed in 4 seconds
Tasklist Management Load Tests finished!!
Parsing log file(s)...
Parsing log file(s) done
Generating reports...

================================================================================
---- Global Information --------------------------------------------------------
> request count                                         40 (OK=40     KO=0     )
> min response time                                     26 (OK=26     KO=-     )
> max response time                                    135 (OK=135    KO=-     )
> mean response time                                    54 (OK=54     KO=-     )
> std deviation                                         28 (OK=28     KO=-     )
> response time 50th percentile                         44 (OK=44     KO=-     )
> response time 75th percentile                         65 (OK=65     KO=-     )
> response time 95th percentile                        111 (OK=111    KO=-     )
> response time 99th percentile                        127 (OK=127    KO=-     )
> mean requests/sec                                      8 (OK=8      KO=-     )
---- Response Time Distribution ------------------------------------------------
> t < 800 ms                                            40 (100%)
> 800 ms < t < 1200 ms                                   0 (  0%)
> t > 1200 ms                                            0 (  0%)
> failed                                                 0 (  0%)
================================================================================
As you can see, the Gatling tests have been sucessfully executed and we actually got the first results in the console, but if you go back to the Job overview and click in the left menu over Gatling, you will be able to see the HTML reports with all the detailed information.
Summary
Here is what we have developed in this post so far:
- Karate features using the BDD syntax
- JUnit runner to use the features as integration tests and generate Cucumber reports
- Gatling runner in Scala to use the features to perform load tests
- Two Jenkins pipelines, one to run the integration tests and the other one to run load tests with custom parameters
And of course, the full code is available in my Git repository, so you can download it in the link below. If you also want to check out the API I used for testing, you can do it here.
See you!