Hello and welcome to a new post! First of all I apologize, but I’ve had some pretty busy months and I’ve left the blog a bit, but I’m back!
Today I will show you how you can secure your APIs with OAuth, especially with Keycloak, which will work as TokenIssuer and where we can manage the different roles and users of our apps.
Configuring Keycloak
First of all, you need to install Keycloak. To do that, you can visit their website and choose the installation mode that fit to your needs, you can choose either a standalone or a containerized version (Docker).
For the purpose of this tutorial, I choosed the standalone. If you do it as well, the only thing you have to do is go to the /bin folder and run the “standalone” shell script. That will start the server so once it is up, you can access your Keycloak instance on http://localhost:8080.
If this is the first time you run Keycloak, you will need to create a new admin user. Remember the credentials as you will need them every time you want to access the Keycloak console.
Create a new Realm
First of all, I extracted the realm definition from the Keycloak documentation:
A realm manages a set of users, credentials, roles, and groups. A user belongs to and logs into a realm. Realms are isolated from one another and can only manage and authenticate the users that they control.
Keycloak dev team
It is pretty to easy create a new Realm in Keycloak:

For this tutorial, I created a Realm called “demo-api”.
Configure the Roles for your API
We can define a role as an abstract definition shared by a certain group of users. For example, an application that is free but with pemium features could define two types of roles to differentiate its users, like ROLE_STANDARD and ROLE_PREMIUM
In this tutorial I will use roles to differentiate the users of my application and the administrators. That way, certain functionalities of my application should be accessible only and exclusively by administrators, and we can do that by defining two roles such as USER and ADMIN.
We can create roles in Keycloak as easy as:
- On the left menu, go to “Roles” and click on the button “+” on the upper right corner
- Name the rol USER and click on “Create”
- Create a new rol “ADMIN” but this time click the option “composite role” and add “USER” as well. This way an user with the rol ADMIN will get directly the capabilities of the rol USER as well, i.e.both roles.

One last thing is, we can define a “standard role” for every new user. That means, when we create a new user in Keycloak, it will receive automatically the role we have defined as default. To do this:

Create a new client
A Realm acts as an organization and can share its configuration among several clients. But each application (or API in our case) is a different client, so we need to create a new one for our demo. On the left side, click on “Clients” and create a new one like the following:

Use the Keycloak API in your application
At this point, we have Keycloak ready to register and manage different users for our api and of course generate JWT tokens which will allow them to authenticate.
To do this, I will use a small API that contains the following endpoints:
POST /api/users- This endpoint allows to create a new user in Keycloak BUT it will be not activated yet. That means, he will not be able to retrieve a Token from Keycloak for log-in. Once the users has been created, the API sends an email to the user with a link and a token to activate it.
PUT /api/users/{user-id}/activate- The API retrieves the user from Keycloak and updates it setting the flat to activated. From this point, the user can retrieve tokens and consume the API.
GET /api/user/hello- This endpoint can be consumed for every user, i.e. users with role ADMIN or USER. It returns just a message like “hello user!”
GET /api/user/hello- This endpoint can only be consumed by users with role ADMIN. It returns just a message like “hello user!”
Furthermore, we need to configure our API with the right credentials so that it can communicate with Keycloak:
# This properties are used to configure the Keycloak client
keycloak-admin:
  auth-server-url: http://localhost:8080/auth
  realm-admin: master
  client-id-admin: admin-cli
  username: binary-mindset
  password: admin

# This properties are used to protect the App with Keycloak
keycloak:
  realm: demo-api
  resource: demo-api-client
  auth-server-url: ${keycloak-admin.auth-server-url}
  ssl-required: external
  public-client: true
  principal-attribute: preferred_username
User sign-up flow
Said that, the flow for registration, log-in and consume the API looks like:

Nevertheless, I will explain everything in detail in the following points.
Create a new user
This is the call we have to perform so that our API communicates to Keycloak and creates a new user.

Once we have done it, if everything went good, we should be able to see our user in the Keycloak admin console:

As you can see, both flags “user enabled” and “email verified” are still off, but the API has already sent an email to the address provided by the user with the activation link.

In the repository of this project, you will find the jar with the fake smtp server so that you can test it as well in your localhost.
Activate the user
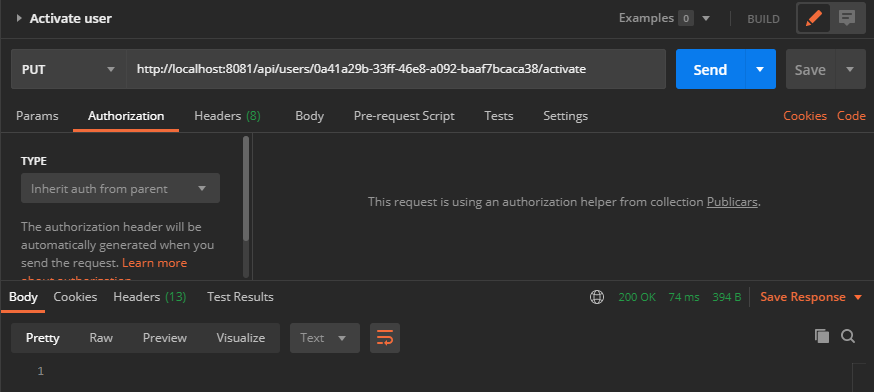
Assuming the user has received the email, the next step is to activate the usser account. This is done with the following call:

Just to check that everything worked, if we go to the Keycloak admin console we will see:

Log-in with username & password
We have already registered and activated a new user, so we could now start to request tokens to Keycloak (log-in). To make this possible, we will need the username and password of our user (makes sense) but also the id and secret of the client that we have created previously in Keycloak.

It is very important that the user we are using has been activated, otherwise Keycloak will return an error. To check the token contains all the needed information and roles, we could introspect it with the site www.jwt.io:

As you can see in the payload the email has been verified, and also contains information like the username, email address and very important, the role which the user has been provided with.
Consume the API
To finish, we can test if the API allows us to consume its protected endpoints. It is very easy to configure that with Spring and the only thing you have to configure is a new annotation in your controller.
For example this endpoint can only be consumed by admins:
@RestController
@PreAuthorize("hasRole('ADMIN')")
public class AdminController implements AdminApiDelegate {

    @Override
    public ResponseEntity<HelloResponse> helloAdmin() {
        HelloResponse response = new HelloResponse();
        response.setResponse("hello admin!");
        return new ResponseEntity<>(response, HttpStatus.OK);
    }
}
However this one can be consumed by everyone:
@RestController
public class UserController implements UsersApiDelegate {

    private final UserService userService;
    private final MailService mailService;
    private final MapperFacade mapperFacade;

    @Autowired
    public UserController(final UserService userService, final MailService mailService, final MapperFacade userMapper) {
        this.userService = userService;
        this.mailService = mailService;
        this.mapperFacade = userMapper;
    }

    @Override
    public ResponseEntity<User> createUser(User user) {

        UserDto newUser = userService.createUser(mapperFacade.map(user, UserDto.class));

        // Send mail to activate account
        mailService.sendEmail("Activate your account", newUser.getEmail(), "http://link-to-activate/" + newUser.getActivationToken());

        return new ResponseEntity<>(mapperFacade.map(newUser, User.class), HttpStatus.OK);
    }

    @Override
    public ResponseEntity<Void> activateUser(String token) {
        userService.activateUser(token);
        return new ResponseEntity<>(HttpStatus.OK);
    }
}
Now let’s call them with the token we have received before and look what happen:


What happened here? Remember our user has the role USER, so the API returns an error 403 Forbidden when trying to call the /admin/hello endpoint!!! On the other hand, we can consume the /user/hello endpoint with no troubles 🙂
Summary
In this tutorial we have learned how to configure Keycloak to secure APIs using OpenId and how to create the different roles that will determine which endpoints are accessible to different users and which are not.
In addition, we have integrated the registration and authentication process between our API and Keycloak, with the corresponding sending of emails for user activation.
Finally, we have learned how to protect the different endpoints of an API developed with Spring Boot.
And of course, you can download the whole source code from my Github repository. If you have any question do not hesitate to drop a message in the section below!
See you!


